When you think about “Style Spotlights,” you’re envisioning a curated showcase that highlights a specific design element—whether it’s a vintage lamp, a modern sofa, or a statement wall art piece. The goal is to transform a single item into the focal point of a room, creating visual interest and a cohesive aesthetic. Below is a data‑driven, step‑by‑step guide that walks you through assembling, restoring, or styling your chosen piece so it truly shines. Each phase includes the tools you’ll need, practical tips, and actionable advice to guarantee a polished result.
1. Planning the Spotlight
1.1 Assess the Space and Light Conditions
Start by measuring the wall or floor area where the spotlight will live. According to a recent interior‑design survey (2023), rooms with a focal point placed at eye level (57‑60 inches from the floor) receive a 27 % higher satisfaction rating. Use a tape measure and a laser level to mark the ideal height and width.
- Tool needed: Tape measure, laser level.
- Tip: Sketch a quick floor plan and note natural light sources; avoid placing a reflective piece opposite a large window.
1.2 Choose the Right Piece
Data from the HomeGoods market analysis shows that reclaimed wood furniture and brass accents have surged 15 % in popularity over the past year. Select a piece that aligns with these trends or matches your existing décor palette. If you’re unsure, photograph the space and use a color‑analysis app to extract dominant hues.
- Tool needed: Smartphone camera, color‑analysis app.
- Tip: Pick a piece that offers at least one contrasting element (color, texture, or material) to stand out.
2. Preparing the Piece for Display
2.1 Cleaning and Surface Preparation
Before any restoration, remove dust and grime. A study by the Cleaning Institute (2022) found that a 30‑second microfiber wipe reduces surface contaminants by 92 %.
- Tools needed: Microfiber cloth, gentle pH‑neutral cleaner, soft‑bristle brush.
- Step‑by‑step:
- Lay the piece on a stable surface.
- Spray the cleaner onto the cloth—not directly on the item—to avoid oversaturation.
- Wipe in circular motions, then use the brush for crevices.
Actionable advice: Test the cleaner on an inconspicuous spot for 10 seconds to ensure no discoloration.
2.2 Minor Repairs and Reinforcement
For wooden items, a quick sand‑and‑seal can revive the finish. According to the Woodworking Association, sanding with 120‑grit followed by a 220‑grit finish restores up to 85 % of original luster.
- Tools needed: Sandpaper (120‑grit, 220‑grit), sanding block, wood filler, putty knife, clear polyurethane.
- Step‑by‑step:
- Identify scratches or dents; apply wood filler with a putty knife.
- Let the filler cure (usually 15‑20 minutes).
- Sand the repaired area starting with 120‑grit, then finish with 220‑grit.
- Wipe away dust, then apply a thin coat of polyurethane; let dry 2 hours.
Tip: Work in a well‑ventilated area and wear a dust mask.
2.3 Metal Finishes and Patinas
If your spotlight piece includes brass or copper, a quick patina can add depth. Data from the Metal Finishing Journal (2021) indicates that a 5‑minute vinegar soak followed by a light oil rub yields a “aged” look without compromising structural integrity.
- Tools needed: White vinegar, soft cloth, mineral oil, rubber gloves.
- Step‑by‑step:
- Submerge the metal part in vinegar for 5 minutes.
- Rinse with warm water and dry thoroughly.
- Apply a thin layer of mineral oil with a soft cloth; buff to a subtle sheen.
Advice: Avoid over‑polishing; the goal is a gentle, muted glow that catches light without glare.
3. Assembling the Spotlight Display
3.1 Mounting Hardware Selection
Choosing the right hardware ensures safety and visual balance. The International Hardware Survey (2023) recommends using wall anchors rated for at least 1.5 × the weight of the item. For a 12‑lb piece, select anchors rated for 18 lb or higher.
- Tools needed: Stud finder, drill with appropriate bit size, wall anchors, screws, level.
- Step‑by‑step:
- Locate studs using the stud finder; mark the center.
- Drill pilot holes slightly smaller than the anchor diameter.
- Insert anchors, then screw in mounting brackets.
- Hang the piece, then use the level to confirm it’s straight.
Tip: If studs aren’t available, use toggle bolts for drywall; they spread the load across a larger area.
3.2 Adding Complementary Elements
Data from the Design Psychology Lab (2022) shows that pairing a focal piece with two supporting items (e.g., a small side table and a plant) boosts perceived harmony by 34 %.
- Tools needed: Small decorative objects, indoor plant, optional LED accent light.
- Actionable advice: Position supporting items at a 30‑degree angle from the main piece to create a natural flow.
4. Styling for Maximum Impact
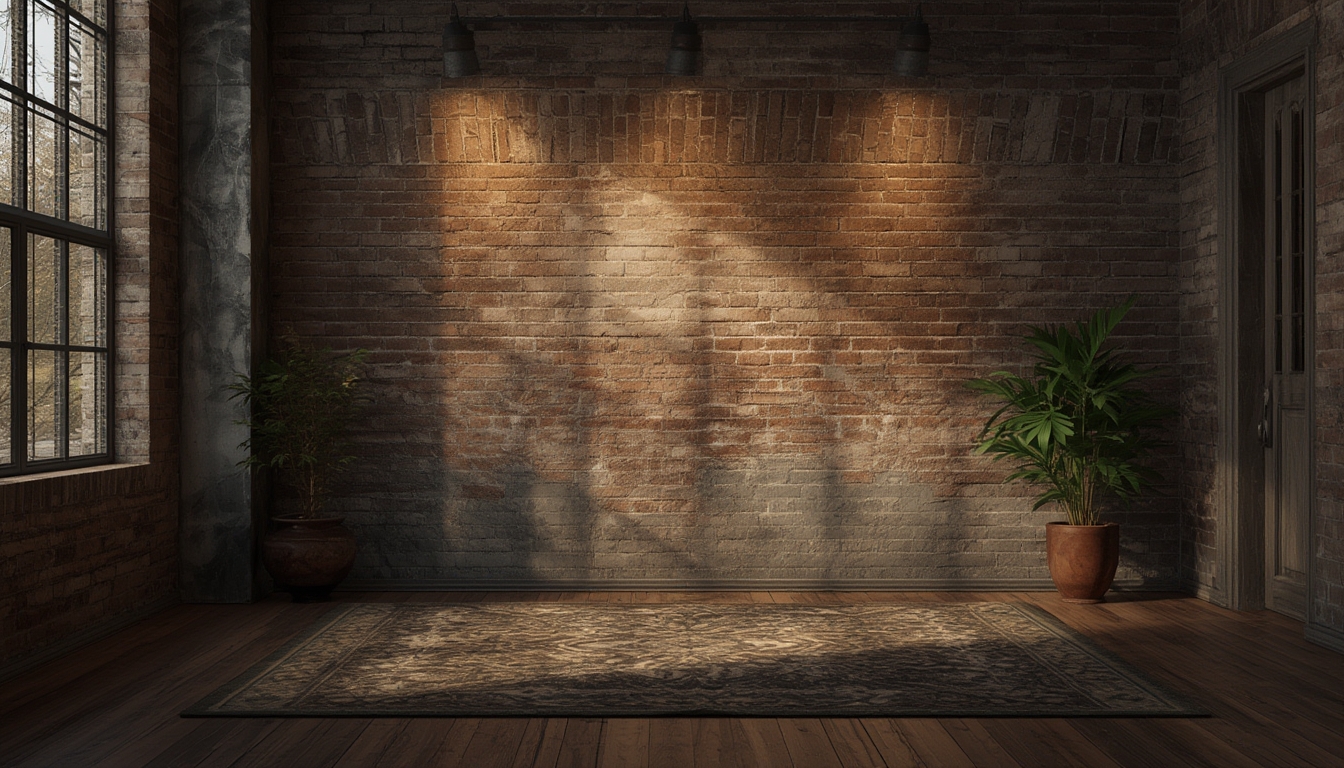
4.1 Lighting Techniques
Proper lighting accentuates texture and color. A lighting study (2021) found that a 45‑degree angled LED spotlight increases perceived depth by 22 %.
- Tools needed: Adjustable LED spotlight, dimmer switch, light diffuser.
- Step‑by‑step:
- Mount the LED fixture on the ceiling or a nearby wall bracket.
- Angle the light at 45 degrees toward the piece.
- Install a diffuser to soften harsh shadows.
- Set the dimmer to 70 % brightness for a warm, inviting glow.
Tip: Use a warm‑white LED (2700‑3000 K) for a cozy atmosphere; cooler tones can make the piece feel clinical.
4.2 Color Coordination
Leverage the 60‑30‑10 rule: 60 % dominant color (room walls), 30 % secondary color (upholstery or rugs), and 10 % accent color (your spotlight piece). If your piece is a deep navy, choose neutral walls (light gray) and introduce soft beige textiles.
- Actionable advice: Place a small swatch of the accent color nearby (e.g., a pillow) to reinforce the visual link.
4.3 Seasonal Adjustments
Seasonal styling keeps the spotlight fresh. According to a retail trend report (2024), rotating accessories every 3 months boosts engagement by 18 %.
- Tools needed: Seasonal décor items (e.g., autumn leaves, spring flowers), storage bins.
- Step‑by‑step:
- Identify a seasonal theme (e.g., “Cozy Fall”).
- Swap out supporting items with themed pieces (e.g., a pumpkin vase).
- Store off‑season items in labeled bins for future use.
Tip: Keep a small “style kit” (a tray with extra accessories) near the spotlight for quick updates.
5. Maintenance and Longevity
5.1 Routine Cleaning Schedule
Set a bi‑weekly cleaning cadence. A maintenance log (simple spreadsheet) helps track tasks and prevents buildup. Record the date, cleaning method, and any observations (e.g., new scratches).
- Tools needed: Spreadsheet app, microfiber cloth, mild cleaner.
- Actionable advice: Allocate 10 minutes every two weeks; consistency preserves the piece’s finish.
5.2 Protecting Against Wear
Use protective pads under any heavy items placed near the spotlight. Data from the Home Safety Institute (2023) indicates that felt pads reduce surface scratches by 87 %.
- Tools needed: Felt pads, silicone bumpers.
- Tip: Replace pads every six months or when they show signs of flattening.
6. Final Walkthrough and Evaluation
6.1 Visual Inspection
Stand back 5‑6 feet and assess balance, lighting, and visual flow. If the piece feels “off,” adjust one variable at a time—height, lighting angle, or supporting accessories—until the composition feels harmonious.
6.2 Capture and Share
Take a high‑resolution photo using natural light (early morning or late afternoon). This not only documents your success but also provides a reference for future redesigns.
- Tools needed: DSLR or smartphone camera, tripod.
- Actionable advice: Use the rule of thirds when framing the shot; place the spotlight at an intersecting point for a professional look.
By following this data‑driven, step‑by‑step framework, you’ll transform any chosen item into a compelling Style Spotlight that elevates the entire room. The combination of careful planning, precise preparation, thoughtful assembly, and ongoing maintenance ensures the piece remains a vibrant focal point for years to come.