
Bold paint colors on the ceiling can instantly transform a room from ordinary to extraordinary, creating a dramatic backdrop that elevates your interior design. While many homeowners shy away from daring hues, a well‑executed statement ceiling adds depth, personality, and a sense of curated style. In this guide, you’ll learn how to choose the perfect bold shade, prep and paint your ceiling like a pro, and pair it with complementary décor—including a thriving houseplant that brings life to the space.
Why Choose a Bold Ceiling?
Ceilings are often the most overlooked surface in a room, yet they have a unique ability to influence perception. A vibrant ceiling can:
- Enlarge the space: Light, saturated colors reflect more light, making a room feel taller.
- Set the mood: Warm reds or deep blues can create cozy, intimate atmospheres, while bright yellows energize.
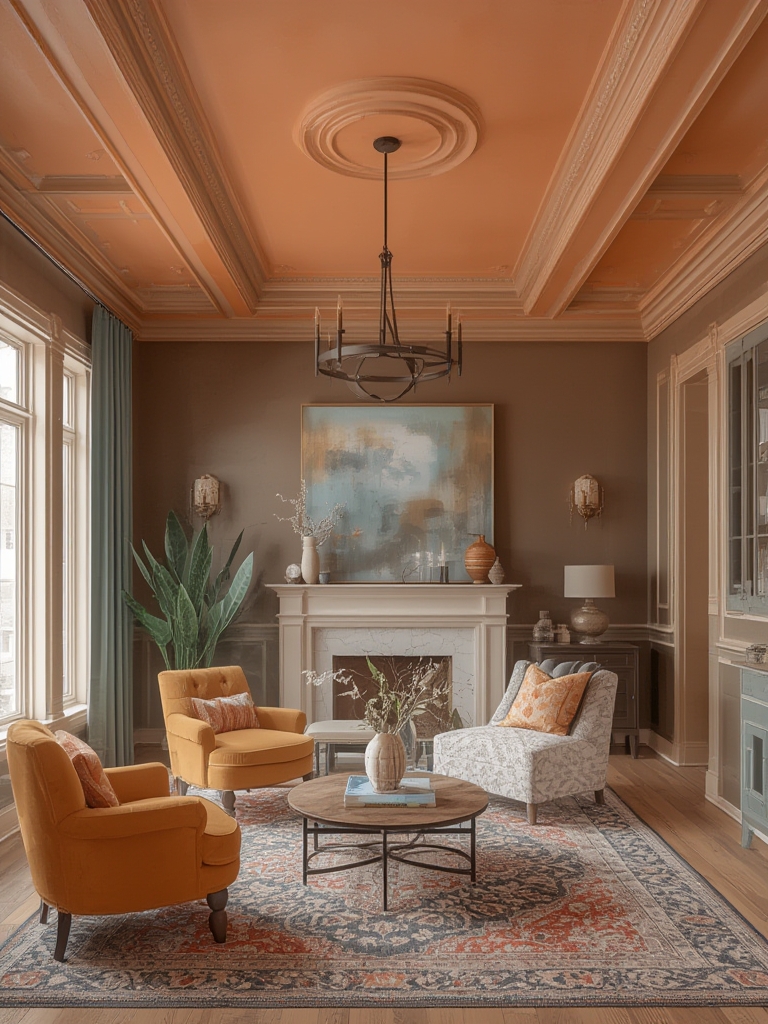
- Highlight architectural features: Crown molding, beams, or exposed rafters become focal points when contrasted with a bold hue.
Choosing the Right Bold Color
Consider the Room’s Purpose
Start by matching the color’s emotional impact to the room’s function. For a lively kitchen, try a sunny mustard or teal. A bedroom benefits from soothing indigo or muted plum, while a home office can thrive on energizing emerald or coral.
Test Samples Before Committing
Paint a 12‑inch square on the ceiling and observe it at different times of day. Look for:
- Color shift under natural light versus artificial light.
- How the hue interacts with wall colors, flooring, and furniture.
- Potential glare or visual fatigue.
Preparing the Ceiling for Paint
Gather Essential Tools
- Drop cloths or plastic sheeting
- Painter’s tape
- Extension pole for roller
- High‑quality ceiling paint (low‑sheen or flat finish works best)
- Primer (especially for dark or glossy surfaces)
- Sandpaper (120‑grit) and a dust brush
Step‑by‑Step Preparation
- Clear the room: Remove furniture or cover it with drop cloths.
- Protect the floor: Lay down heavy‑duty plastic sheeting.
- Clean the ceiling: Wipe away dust, cobwebs, and grease with a damp cloth; for kitchens, a mild degreaser works well.
- Repair imperfections: Fill cracks or holes with spackle, sand smooth, and wipe clean.
- Prime if needed: Apply a coat of primer to ensure even color coverage, especially on light‑colored ceilings.
- Mask edges: Use painter’s tape to protect walls, trim, and light fixtures.
Painting the Ceiling Like a Pro
Technique Tips
- Work in sections: Divide the ceiling into 4‑foot squares for manageable coverage.
- Use a roller with a thick nap: This captures more paint and reduces lap lines on textured surfaces.
- Maintain a wet edge: Overlap each stroke while the paint is still wet to avoid streaks.
- Apply two thin coats: This prevents drips and ensures uniform color intensity.
Step‑by‑Step Painting Process
- Pour paint into a tray and load the roller evenly.
- Start in a corner and roll in a “W” pattern, filling in without lifting the roller.
- Work outward, maintaining a steady pace.
- Allow the first coat to dry (typically 2‑4 hours, depending on humidity).
- Lightly sand any imperfections, clean the surface, and apply the second coat.
- Remove painter’s tape while the paint is still slightly tacky to avoid tearing.
Styling the Space Around a Bold Ceiling
Balance with Neutral Walls
Keep wall colors in the same tonal family but lighter in saturation. Soft whites, warm greys, or muted pastels let the ceiling remain the star without overwhelming the eye.
Incorporate Textures and Metallics
Gold or brass light fixtures, woven rugs, and natural wood furniture add depth and soften the intensity of a vivid ceiling. Mirrors reflect light, amplifying the color’s vibrancy.
Introduce a Statement Plant
A lush houseplant not only adds a splash of green but also creates a natural counterpoint to bold hues. The Fiddle Leaf Fig (Ficus lyrata) is an excellent choice for its dramatic foliage and architectural presence.
Growing and Caring for a Fiddle Leaf Fig
Step‑by‑Step Care Guide
- Light: Place the fig near an east‑ or west‑facing window where it receives bright, indirect sunlight for at least 6 hours daily. Avoid direct afternoon sun that can scorch leaves.
- Watering: Water when the top 2‑inch of soil feels dry. Use room‑temperature water, thoroughly soaking the root ball, then allow excess to drain. Over‑watering leads to root rot; under‑watering causes leaf browning.
- Humidity: Maintain 40‑60 % humidity. Mist leaves weekly or use a pebble tray with water to boost moisture, especially in winter heating season.
- Feeding: Apply a balanced, water‑soluble fertilizer (e.g., 10‑10‑10) once a month during the growing season (spring‑early fall). Reduce feeding in winter.
- Pruning: Trim any yellow or damaged leaves at the base with clean scissors. To encourage a bushier shape, pinch back new growth just above a node.
- Repotting: Every 1‑2 years, move the fig to a pot 2‑3 inches larger with fresh, well‑draining potting mix (a blend of peat, perlite, and pine bark). Repot in early spring before new growth starts.
Practical Tips for Success
- Rotate regularly: Turn the plant a quarter turn every week to ensure even light exposure and prevent one‑sided growth.
- Watch for pests: Inspect leaves weekly for spider mites or mealybugs. Treat infestations early with neem oil or insecticidal soap.
- Use a saucer: Place a saucer under the pot to catch runoff, protecting your newly painted floor from water stains.
- Mind the temperature: Keep the fig in a room that stays between 65‑75 °F (18‑24 °C). Drafty windows or sudden temperature drops can cause leaf drop.
Final Thoughts
Choosing a bold paint color for your ceiling is a powerful way to make a statement without overwhelming the entire space. By following a systematic preparation and painting process, you’ll achieve a flawless finish that showcases your design confidence. Pair the vibrant ceiling with balanced neutrals, textured accents, and a thriving Fiddle Leaf Fig to create a harmonious, Instagram‑ready room that feels both stylish and livable. Ready to lift your décor to new heights? Grab that paint can, roll up your sleeves, and let your ceiling become the canvas of your home’s personality.