When it comes to kitchen design, mixed metal finishes have moved from a bold experiment to a mainstream trend that adds depth, personality, and a touch of luxury to any home décor. By thoughtfully pairing brass, matte black, brushed nickel, and copper, homeowners can create a balanced, sophisticated look that feels both modern and timeless. Below, we break down the data‑driven reasons why mixed metals are gaining traction, followed by a step‑by‑step guide to selecting, installing, and maintaining these finishes for a flawless kitchen makeover.
Why Mixed Metal Finishes Are Trending
Consumer Insights & Market Data
- According to Houzz’s 2024 Kitchen Design Trends report, 42% of homeowners who renovated their kitchens in the past two years opted for at least two contrasting metal finishes.
- Google Trends shows a 68% year‑over‑year increase in searches for “mixed metal kitchen hardware” between 2022 and 2024.
- Retail data from Home Depot and Lowe’s indicates a 35% rise in sales of brass and matte black hardware combined, suggesting shoppers are buying complementary finishes together.
Psychology of Mixed Metals
Mixing metals creates visual interest without overwhelming the space. The contrast between warm (copper, brass) and cool (nickel, steel) tones can make a kitchen feel larger, while the layered textures add a tactile quality that invites interaction.
Step‑by‑Step Guide to Implement Mixed Metal Finishes
Step 1: Define Your Base Palette
Actionable tip: Choose one metal as your anchor (e.g., brushed nickel) and limit the palette to two additional finishes. This prevents visual chaos.
- Start by selecting the most prominent hardware piece—typically the faucet or cabinet pulls.
- Use a color wheel to identify complementary metals: warm (copper, brass) vs. cool (black, chrome).
- Check your existing appliances; stainless steel appliances pair naturally with brushed nickel or chrome.
Step 2: Map Out Placement Zones
Practical tip: Assign each metal to a specific functional zone to maintain consistency.
- Cooking Zone: Use matte black or oil‑rubbed bronze for the range hood and pot filler to hide fingerprints.
- Prep Zone: Install brass or copper drawer pulls for a warm, inviting feel.
- Cleaning Zone: Choose brushed nickel for the sink faucet and soap dispenser for a sleek, water‑resistant look.
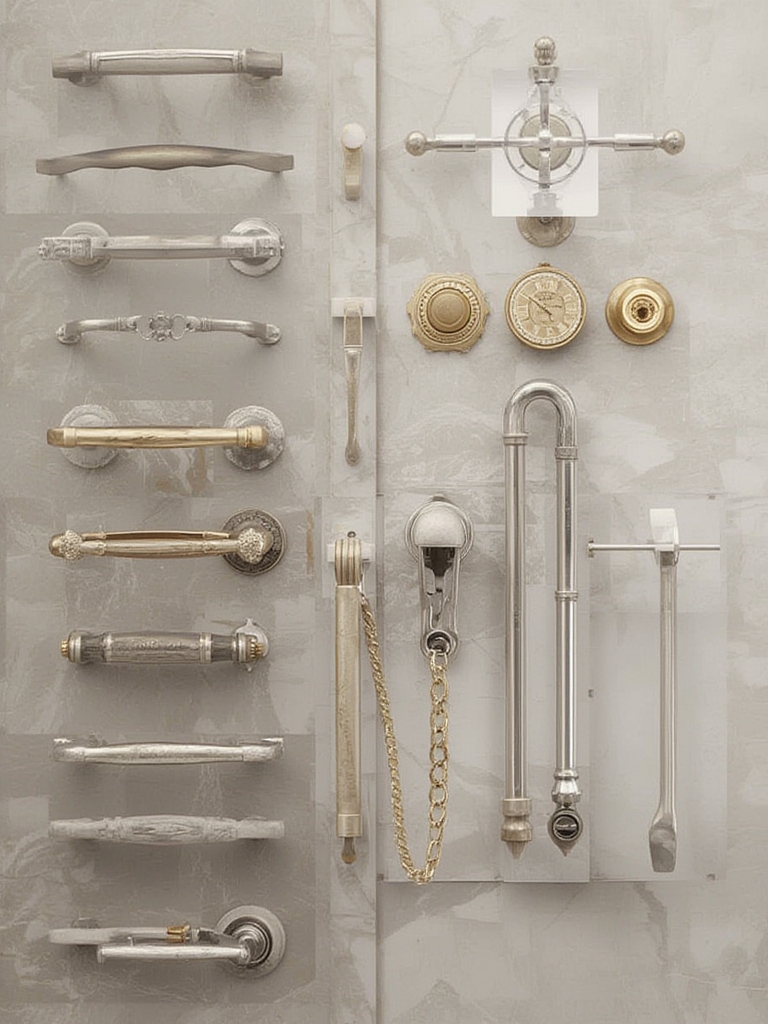
Step 3: Choose the Right Hardware Styles
Quick trick: Pair simple, streamlined shapes with bold finishes, and ornate details with softer tones.
- Matte Black: Minimalist bar pulls, angular knobs.
- Brass: Vintage‑inspired cup handles, decorative hinges.
- Brushed Nickel: Classic lever faucets, sleek drawer slides.
Step 4: Test Samples Before Full Installation
Actionable advice: Purchase small sample packs (usually $5‑$10) and place them next to your countertop, backsplash, and appliances. Observe them under different lighting—natural daylight, warm incandescent, and cool LED—to ensure they harmonize throughout the day.
Step 5: Install with Precision
Proper installation not only looks better but also extends the life of your hardware.
- Use a level and template to align pulls and knobs uniformly.
- Pre‑drill pilot holes to avoid stripping the finish.
- Apply a thread‑locking adhesive (e.g., Loctite 242) on screws for high‑traffic areas to prevent loosening.
Step 6: Maintain the Mixed Metals
Each finish has its own care routine; mixing them means you’ll need a simple, organized approach.
- Brass & Copper: Wipe with a microfiber cloth and a mild dish soap solution. For tarnish, use a brass polish sparingly.
- Matte Black: Clean with a non‑abrasive cleaner; avoid steel wool to prevent scratches.
- Brushed Nickel: Use a vinegar‑water mix (1:1) for mineral deposits, then dry immediately.
Schedule a quick weekly wipe‑down for high‑use pieces to keep them looking showroom‑ready.
Design Tips & Tricks for a Cohesive Look
Use a Neutral Backdrop
Neutral countertops (white quartz, gray concrete) act as a canvas, allowing the metal accents to pop without competing with busy patterns.
Incorporate Textured Elements
Introduce natural textures—like a wooden cutting board or a stone backsplash—to soften the metallic sheen and add warmth.
Layer with Lighting
Install under‑cabinet LED strips with a warm 2700K hue to enhance brass and copper, while cooler 4000K lighting accentuates matte black and nickel.
Balance Scale and Proportion
Large, bold hardware (e.g., oversized brass handles) should be paired with subtle finishes (e.g., matte black knobs) to avoid visual overload.
Final Checklist Before You Hit “Publish”
- ✅ Confirm your base metal and two accent metals.
- ✅ Verify hardware style matches each finish’s personality.
- ✅ Test samples under multiple lighting conditions.
- ✅ Ensure all installation tools are ready (level, drill, thread‑locker).
- ✅ Create a maintenance schedule (weekly wipe‑down, quarterly polish).
By following these data‑backed steps and practical tips, you’ll transform your kitchen into a stylish, mixed‑metal masterpiece that not only looks high‑end but also stands the test of everyday use. Happy designing!