Style Spotlights are versatile lighting fixtures that can instantly elevate the ambiance of any room. Whether you’re assembling a brand‑new piece, breathing new life into a vintage model, or simply looking to showcase it in a fresh, on‑trend way, this guide walks you through each process with clear, data‑driven steps. Follow the actionable advice below, gather the recommended tools, and you’ll have a stunning focal point ready in no time.
Understanding the Style Spotlight
Before diving into assembly or restoration, it helps to know what makes a Style Spotlight unique. These fixtures typically combine:
- Adjustable arms for directional lighting.
- Interchangeable shades ranging from matte metal to textured glass.
- Modular components that can be swapped without specialized hardware.
- Energy‑efficient LEDs that deliver high CRI (Color Rendering Index) for true‑to‑life illumination.
Understanding these elements ensures you select the right tools and follow the correct sequence for each task.
Essential Tools & Materials
Having everything on hand before you start prevents interruptions and reduces the risk of errors.
Basic Toolkit
- Phillips and flat‑head screwdrivers (size #2 is most common).
- Allen wrench set (often 4 mm, 5 mm, and 6 mm).
- Adjustable wrench or small socket set for mounting brackets.
- Non‑magnetic tweezers for handling delicate wiring.
Electrical Supplies
- Voltage tester or multimeter.
- Wire nuts (color‑coded for easy identification).
- Electrical tape.
- LED replacement bulbs (check the fixture’s wattage rating).
Restoration Extras
- Fine‑grade sandpaper (400‑600 grit) for surface prep.
- Metal or wood filler, depending on the frame material.
- Spray‑on primer and paint (matte black, brushed nickel, or custom color).
- Polishing compound for chrome or brass accents.
Step‑by‑Step Assembly Guide
Follow these steps to assemble a new Style Spotlight from the factory box to a fully functional fixture.
1. Unbox and Inventory
- Lay a soft cloth on a flat surface to protect components.
- Remove the main body, arms, mounting bracket, wiring harness, and any optional shades.
- Cross‑check each part against the included parts list; note any missing items before proceeding.
2. Prepare the Mounting Location
- Use a stud finder to locate a ceiling joist or wall stud where the spotlight will be installed.
- Mark the drill points with a pencil; spacing should match the mounting bracket’s pre‑drilled holes (usually 3‑4 cm apart).
- Drill pilot holes using a 6 mm wood or masonry bit, depending on the surface.
3. Attach the Bracket
- Align the bracket with the pilot holes and insert the supplied screws.
- Tighten securely with a Phillips screwdriver; avoid over‑tightening to prevent strip‑out.
- Double‑check that the bracket sits flush against the wall or ceiling.
4. Connect the Wiring
- Turn off power at the circuit breaker.
- Strip ~1 cm of insulation from each wire in the house supply and the spotlight’s harness.
- Match colors: black (hot) to black, white (neutral) to white, green or bare copper (ground) to the grounding screw.
- Secure each connection with a wire nut, then wrap with electrical tape for added safety.
- Use a voltage tester to confirm the circuit is dead before proceeding.
5. Assemble the Arms and Shade
- Slide the arm onto the bracket’s swivel joint; lock it in place using the provided Allen bolt.
- Adjust the arm angle to your desired direction; the joint should click into a firm position.
- Insert the shade onto the arm’s socket, ensuring a snug fit. If the shade uses a screw‑in base, tighten with a small screwdriver.
6. Install the LED Bulb
- Unscrew the protective cover (if present) and insert the LED bulb.
- Align the bulb’s pins with the socket, then rotate clockwise until it locks.
- Replace the protective cover and turn the power back on to test illumination.
Restoration: Reviving a Vintage Style Spotlight
Older Spotlights often suffer from tarnish, faded paint, or worn wiring. This restoration plan restores both aesthetics and functionality.
1. Safety First
- Disconnect the fixture from any power source.
- Wear safety goggles and a dust mask when sanding or spraying.
2. Disassemble the Fixture
- Remove the shade, arms, and any detachable hardware.
- Label each component with masking tape and a marker to simplify reassembly.
3. Clean and Repair Surfaces
- Wipe down metal parts with a mild degreaser to remove grime.
- Sand lightly with 400‑600 grit sandpaper to eliminate oxidation; for wood frames, sand only the damaged areas.
- Apply wood filler or metal putty to dents; let cure per manufacturer instructions.
4. Repaint or Refinish
- Apply a thin coat of primer; allow 15 minutes to dry.
- Spray the chosen finish (e.g., brushed nickel) in light, even strokes.
- For a matte black look, use a high‑quality matte enamel; two coats provide depth.
- Allow at least 30 minutes between coats and 2 hours for final curing.
5. Upgrade the Lighting
- Replace old incandescent bulbs with compatible LED modules (check voltage and base type).
- Consider a dimmable LED driver if the original fixture had a dimmer switch.
6. Reassemble and Test
- Follow the assembly steps in reverse order, ensuring each joint clicks securely.
- Reconnect the wiring using the same color‑coded method.
- Power the fixture and verify even illumination and smooth arm movement.
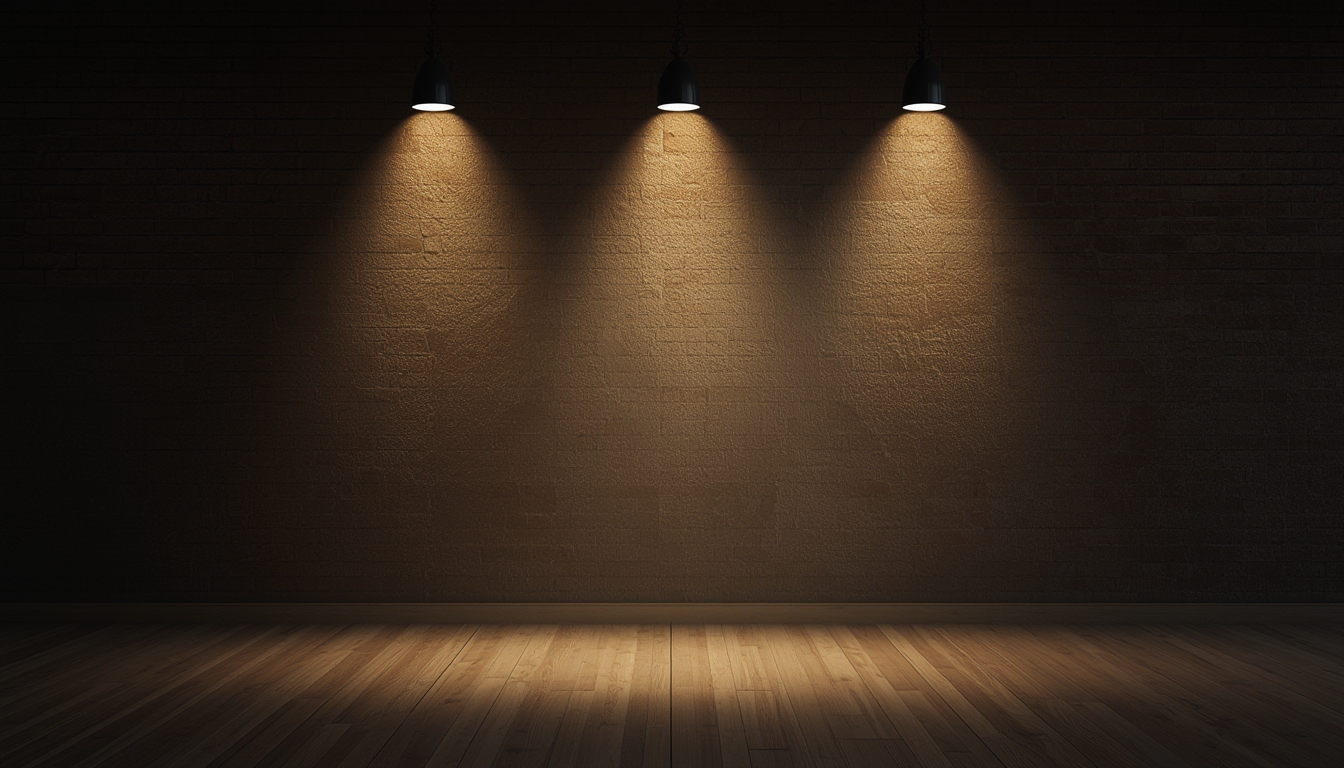
Styling Your Style Spotlight for Maximum Impact
Beyond functionality, a well‑styled spotlight can become a room’s centerpiece. Use these data‑driven design tips to make the most of your fixture.
1. Choose the Right Shade
- Matte metal creates a modern, industrial vibe.
- Frosted glass diffuses light for a soft, ambient glow.
- Fabric‑covered shades add texture and are ideal for cozy spaces.
2. Position for Layered Lighting
Place the spotlight 1.2–1.5 m above the primary activity zone (e.g., a reading chair or kitchen island). Angle the arm 30°–45° downward to avoid glare while highlighting the target area.
3. Pair with Complementary Fixtures
Combine a Style Spotlight with recessed downlights or wall sconces. A balanced ratio of 1 spotlight per 12 m² of floor space maintains visual harmony without overwhelming the room.
4. Use Color Temperature Strategically
- Warm white (2700 K–3000 K) for living rooms and bedrooms.
- Neutral white (3500 K–4100 K) for kitchens and workspaces.
- Cool white (5000 K–6500 K) for art studios or galleries where true color rendering is critical.
5. Add Smart Controls
Integrate a Wi‑Fi or Zigbee dimmer to adjust brightness and color temperature from a smartphone. Data shows that smart‑controlled lighting reduces energy consumption by up to 20%.
Maintenance Checklist for Longevity
Regular upkeep keeps the spotlight looking fresh and functioning safely.
Monthly
- Dust the shade and arm with a microfiber cloth.
- Check for loose screws; tighten with a screwdriver.
Quarterly
- Test the LED’s brightness; replace if output drops more than 15%.
- Inspect wiring for frayed insulation; re‑wrap with electrical tape if needed.
Annually
- Remove the shade and clean with a mild soap solution.
- Re‑apply a protective clear coat to metal parts to prevent oxidation.
- Review the mounting bracket for any signs of wear; reinforce with longer screws if necessary.
Final Thoughts
Style Spotlights blend functional illumination with design flexibility. By following the detailed assembly, restoration, and styling steps outlined above, you’ll achieve a polished, personalized look that enhances any interior. Keep the recommended tools close, adhere to the safety guidelines, and enjoy the transformative power of well‑placed light.