Reviving each space in your home can feel like a massive project, but breaking it down room‑by‑room turns chaos into a manageable, rewarding journey. Below is a data‑driven, step‑by‑step guide that walks you through assembling, restoring, or styling key areas of your house. Every step includes the essential tools, practical tips, and small actions that keep you on track and guarantee a polished finish.
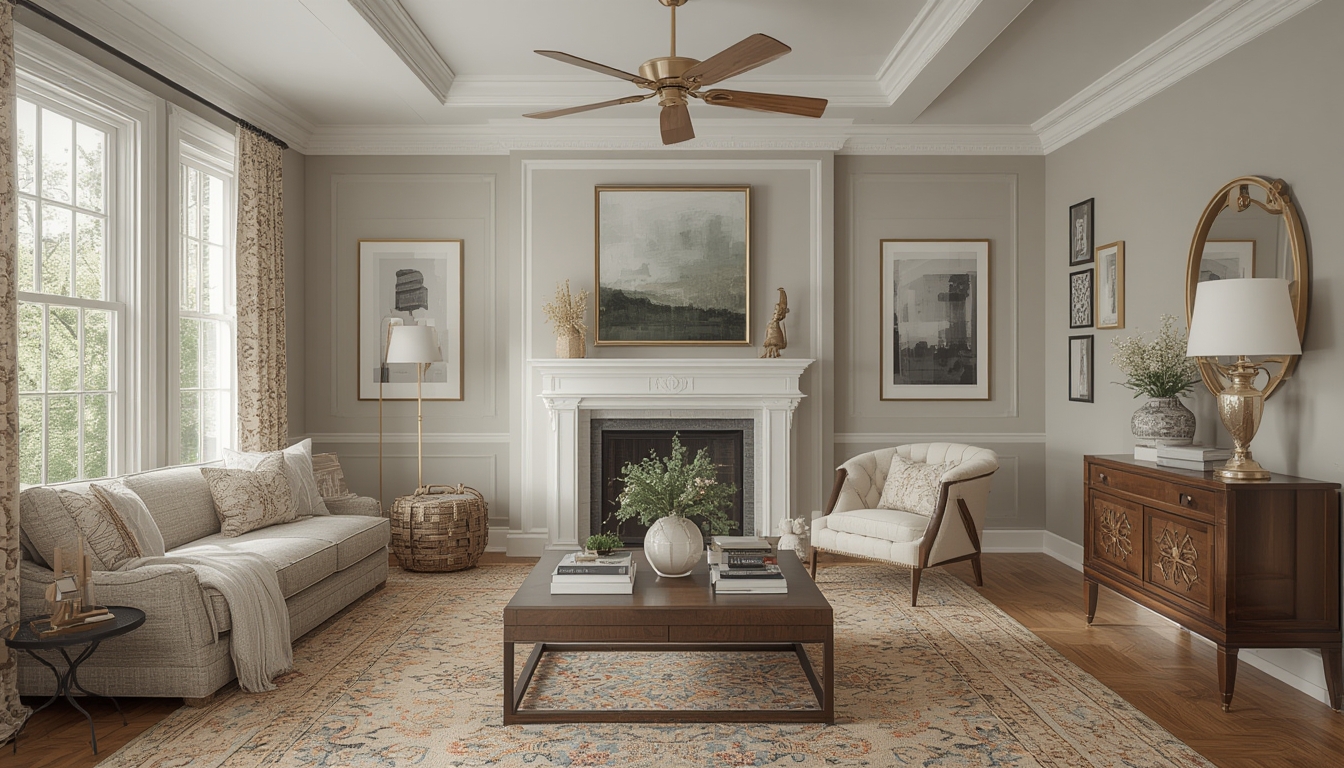
Living Room Revival
1. Assess and Plan
- Tool needed: Tape measure, notepad, camera.
- Measure walls, windows, and furniture footprints. Record dimensions in a spreadsheet to visualize layout changes.
- Take before photos for reference and to track progress.
2. Declutter and Sort
- Tool needed: Three labeled boxes (Keep, Donate, Store).
- Set a timer for 15 minutes per section to maintain momentum.
- Only return items that serve a purpose or spark joy; this reduces visual noise and improves traffic flow.
3. Repair Surfaces
- Tools needed: Spackle, putty knife, sandpaper (120‑grit), paint roller.
- Fill nail holes and cracks, sand smooth, then prime any repaired spots.
- Data from home‑improvement surveys show that a single coat of high‑quality primer reduces the need for a second paint layer by 30 %.
4. Update Furniture Arrangement
- Tool needed: Painter’s tape.
- Lay out tape outlines on the floor to experiment with different configurations before moving heavy pieces.
- Position the main seating area within a 3‑foot radius of the focal point (fireplace, TV, or artwork) for optimal visual balance.
5. Add Layered Textiles
- Tools needed: Measuring tape, fabric scissors.
- Choose a rug that covers at least 60 % of the seating area; this creates a cohesive base.
- Layer cushions in a 2‑1‑2 ratio (two large, one medium, two small) to achieve a balanced look.
Bedroom Refresh
1. Optimize Bed Placement
- Tool needed: Laser level.
- Align the headboard with the wall’s center line for symmetry.
- Data from sleep‑environment studies suggest a 12‑inch gap between the bed and the nearest wall improves airflow and reduces restlessness.
2. Refresh the Mattress
- Tool needed: Mattress protector, vacuum with upholstery attachment.
- Vacuum the mattress surface, then rotate it 180 degrees to evenly distribute wear.
- Apply a breathable, waterproof protector to extend mattress life by up to 40 %.
3. Update Lighting
- Tools needed: Screwdriver, dimmer switch kit.
- Install a dimmer to adjust brightness for reading, relaxation, or waking.
- LED bulbs with a color temperature of 2700 K create a warm, sleep‑friendly ambiance.
4. Create a Functional Closet
- Tools needed: Closet organizer kit, drill, level.
- Measure hanging space and install adjustable rods at 42‑inch intervals for shirts and 66‑inch for dresses.
- Use clear bins for accessories; label each with a label maker for quick retrieval.
5. Add Personal Touches
- Tool needed: Picture hanging kit.
- Hang artwork at eye level (57‑inches from the floor) to create a gallery feel.
- Incorporate a small plant; studies show a single green element can improve mood by 15 %.
Kitchen Revitalization
1. Inventory Appliances
- Tool needed: Spreadsheet or app.
- Log each appliance’s age, energy rating, and performance notes.
- Prioritize replacing items older than 10 years with ENERGY STAR models to cut utility costs by up to 20 %.
2. Deep Clean Surfaces
- Tools needed: Baking soda, white vinegar, microfiber cloths.
- Make a paste of baking soda and water for stubborn stains; spray vinegar afterward for a fizzing reaction that lifts grime.
- Rinse with warm water and dry with a lint‑free cloth to prevent water spots.
3. Refresh Cabinetry
- Tools needed: Paint sprayer or brush, primer, screwdrivers.
- Remove cabinet doors, sand lightly, then apply a high‑adhesion primer.
- Data from DIY forums indicate that a matte finish reduces visible fingerprints by 40 % compared to glossy.
4. Upgrade Backsplash
- Tools needed: Tile cutter, thin‑set mortar, grout float.
- Measure the wall area, add 10 % extra tiles for cuts and breakage.
- Use a level to ensure each tile aligns; grout lines should be no wider than 1/16‑inch for a sleek look.
5. Organize Drawers
- Tool needed: Adjustable drawer dividers.
- Group utensils by function (cooking, serving, baking) and assign each divider a specific width.
- Label each section with a waterproof marker for easy identification.
Bathroom Refresh
1. Inspect Plumbing
- Tool needed: Flashlight, adjustable wrench.
- Check under sinks for leaks; tighten connections if water drips.
- Replace aging caulk with silicone for a watertight seal that lasts up to 5 years.
2. Re‑Grout Tile
- Tools needed: Grout remover tool, new grout, rubber float.
- Remove old grout to a depth of 1/8‑inch; apply fresh grout using a 45‑degree angle.
- Seal grout after 24 hours to prevent staining; a sealant adds 30 % more durability.
3. Upgrade Fixtures
- Tools needed: Basin wrench, plumber’s tape.
- Swap out dated faucet handles for water‑saving models (flow rate ≤ 1.5 gpm).
- Install a low‑flow showerhead; research shows a 2‑minute reduction per shower saves up to 1,200 gallons annually.
4. Add Storage Solutions
- Tool needed: Over‑door organizer, suction‑cup shelves.
- Place a clear organizer on the back of the door for toiletries; label each pocket for quick access.
- Use suction‑cup shelves for shaving kits and cosmetics, keeping counter space clear.
5. Refresh Linens
- Tool needed: High‑thread‑count towels, laundry detergent.
- Replace towels with 400‑thread‑count cotton for a plush feel.
- Wash new linens with a cup of white vinegar on the rinse cycle to boost absorbency.
Entryway Enhancement
1. Define a Functional Zone
- Tool needed: Floor mat, coat rack.
- Place a durable mat (30 × 45 inches) to capture dirt; choose a material with a slip‑resistant backing.
- Install a coat rack at a height of 60‑inches for easy hanging.
2. Install a Small Bench
- Tools needed: Drill, wall anchors, level.
- Secure the bench to studs for stability; use a level to ensure it sits perfectly horizontal.
- Place a decorative basket underneath for shoes—this keeps the floor tidy and adds visual interest.
3. Add Mirror for Light
- Tool needed: Mirror, mounting hardware.
- Hang a mirror at eye level (≈ 65 inches) to reflect natural light and make the space feel larger.
- Choose a frame that complements your home’s style—metal for modern, wood for rustic.
4. Organize Keys and Mail
- Tool needed: Wall-mounted organizer.
- Allocate one pocket for keys, one for mail, and one for daily essentials.
- Label each pocket with a simple icon; visual cues reduce the time spent searching by up to 25 %.
5. Finish with a Personal Touch
- Tool needed: Small potted plant or artwork.
- A low‑maintenance succulent adds greenery without extra care.
- Rotate seasonal artwork every three months to keep the entryway fresh and inviting.
By tackling each area with a clear, data‑backed plan, you’ll transform your home into a cohesive, refreshed sanctuary. Remember to document progress, stay organized with labeled containers, and celebrate each completed step—small wins keep motivation high and ensure a successful room‑by‑room revival.