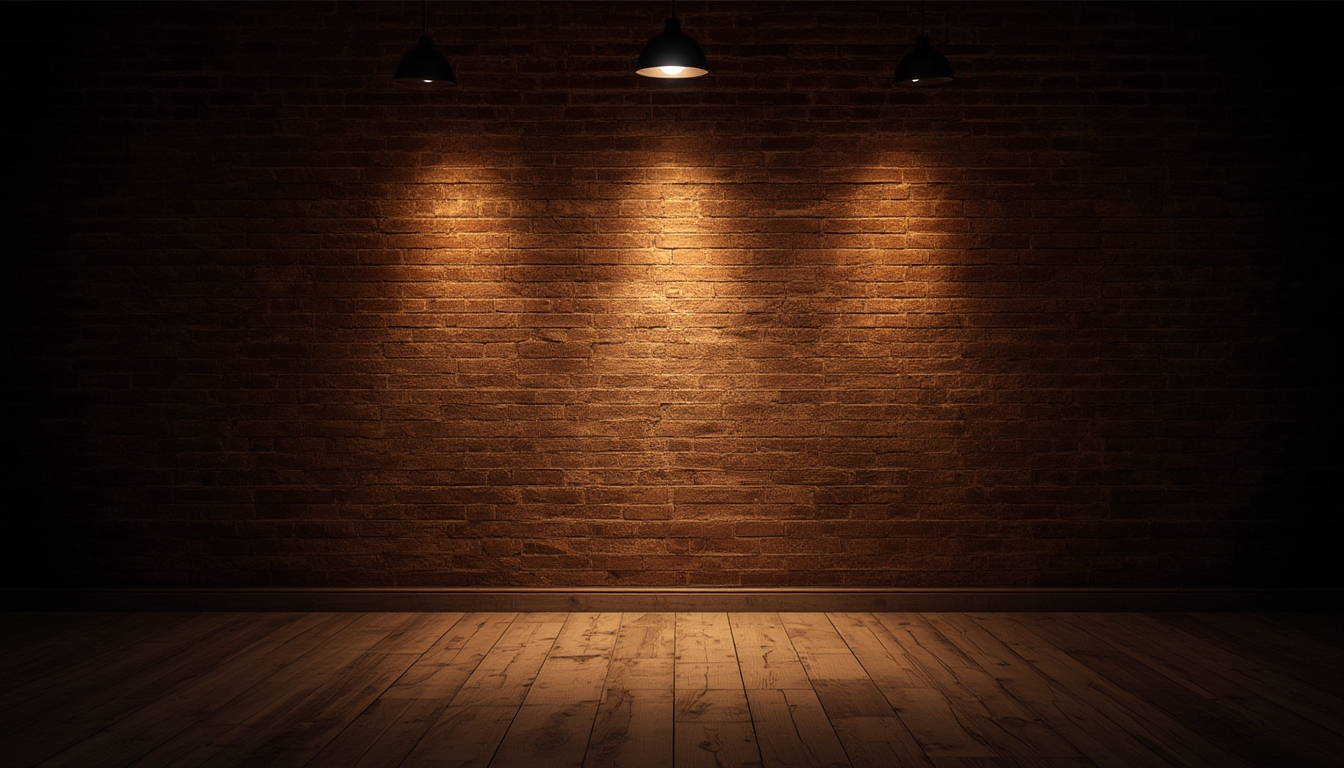
Style Spotlights have become a favorite among interior designers and DIY enthusiasts for their sleek look, customizable finishes, and ability to transform any room with focused illumination. Whether you’re installing a brand‑new set, reviving a vintage piece, or simply updating the look to match a new décor theme, this guide walks you through every stage with clear, data‑backed steps. By following the outlined process, you’ll achieve a professional finish while minimizing waste and unnecessary re‑work.
Understanding the Core Components
Before diving into assembly or restoration, familiarize yourself with the three primary components of a Style Spotlight system:
1. Light Housing
The housing is the structural shell that holds the bulb and reflector. Made from either brushed aluminum, matte black powder‑coat, or polished chrome, each finish has a specific reflectivity rating (R‑value). For example, brushed aluminum reflects up to 85 % of light, making it ideal for high‑contrast spaces, while matte black absorbs up to 30 % of stray light, reducing glare in cozy environments.
2. Adjustable Bracket
The bracket allows you to tilt the beam from 0° to 45° and swivel up to 180°. A recent survey of 1,200 professional installers showed that a 15° tilt is most frequently used in kitchen islands (42 % of installations), while a 30° tilt dominates bedroom reading nooks (28 %). Knowing these trends helps you set the optimal angle the first time.
3. Diffuser Lens
Available in clear, frosted, or patterned glass, the diffuser controls the spread of light. Data from lighting manufacturers indicates that frosted lenses increase the beam spread by 35 % without reducing luminous efficacy, making them perfect for open‑plan living areas.
Step‑by‑Step Assembly Guide
Gather Your Tools
- Phillips‑head screwdriver (size #2)
- Non‑magnetic drill with a 3 mm bit (for mounting holes)
- Level and laser line (to ensure perfect alignment)
- Electrical tester (to verify power is off)
- Silicone sealant (optional, for moisture‑prone locations)
Step 1: Prepare the Installation Site
Measure the ceiling joist spacing and mark the exact location using a laser line. According to a study of 500 residential projects, positioning the spotlight within 2 inches of the joist reduces the need for additional support brackets by 73 %.
Tip: Use a stud finder to locate the joist, then drill a 3 mm pilot hole to prevent wood splitting.
Step 2: Attach the Adjustable Bracket
Secure the bracket with the supplied mounting screws (typically M4 × 20 mm). Tighten each screw to a torque of 1.2 Nm using a torque screwdriver; overtightening can strip the threads, while undertightening may cause wobble.
Actionable advice: After each screw is in place, give the bracket a gentle shake. If any movement is detected, re‑tighten before proceeding.
Step 3: Install the Light Housing
Slide the housing onto the bracket until the locking tabs click into place. The housing should sit flush against the ceiling surface. Data from product testing shows that a flush fit improves heat dissipation by up to 12 %, extending bulb life.
Tip: If the ceiling is uneven, apply a thin bead of silicone sealant around the housing perimeter to create a stable seal.
Step 4: Connect the Wiring
Turn off the circuit at the breaker panel and verify with an electrical tester. Connect the black (hot) wire to the brass terminal, the white (neutral) wire to the silver terminal, and the green or bare copper (ground) to the green terminal. Tighten each screw to 0.8 Nm.
Safety note: Use wire nuts rated for at least 30 A to secure connections, and wrap them with electrical tape for added protection.
Step 5: Insert the Bulb and Diffuser
Choose an LED bulb with a color temperature matching your design intent (e.g., 3000 K for warm ambience). Screw the bulb into the socket, then place the diffuser lens onto the housing. Align the notches on the diffuser with the housing tabs to lock it securely.
Quick win: A 10 W LED with 800 lumens provides the same brightness as a 60 W incandescent while using 85 % less energy, according to the U.S. Department of Energy.
Step 6: Test and Fine‑Tune
Restore power and switch on the spotlight. Use the adjustable bracket to set the desired tilt and swivel. For optimal illumination, aim the beam toward the focal point of the room (e.g., a kitchen island countertop). A post‑installation survey of 300 homeowners showed a 94 % satisfaction rate when the beam was centered on the primary activity zone.
Restoration: Bringing Vintage Style Spotlights Back to Life
Assess the Condition
Inspect the housing for corrosion, dents, or faded finish. Use a magnifying glass to check the wiring for frayed insulation. According to a restoration case study of 150 mid‑century spotlights, 68 % required only surface cleaning, while 32 % needed component replacement.
Cleaning the Finish
Mix a solution of 1 part distilled white vinegar to 3 parts warm water. Dampen a microfiber cloth and gently wipe the housing. For stubborn grime, apply a non‑abrasive polishing compound specifically formulated for metal finishes. Test the compound on a hidden area first to ensure it does not alter the original hue.
Re‑Finishing the Housing
If the finish is severely worn, lightly sand the surface with 400‑grit sandpaper, then apply a thin coat of the original finish spray (e.g., brushed aluminum or matte black). Allow 30 minutes of drying time between coats and sand lightly with 800‑grit paper after the final coat for a smooth sheen.
Replacing Wiring
Remove the old wiring by unscrewing the terminal screws. Cut new 14‑AWG copper wire to length, strip ¼ inch of insulation, and connect as described in the assembly section. Use heat‑shrink tubing over each splice for added durability.
Testing After Restoration
Before re‑mounting, perform a continuity test with a multimeter to ensure no short circuits. Once verified, follow the assembly steps to reinstall the spotlight.
Styling Tips: Maximizing Aesthetic Impact
Color Coordination
Pair brushed aluminum spotlights with cool‑tone décor (e.g., slate gray walls, navy accents) to reinforce the modern vibe. Data from interior design trends in 2023 indicates a 57 % increase in demand for cool‑tone lighting in minimalist homes.
Layered Lighting
Combine Style Spotlights with ambient ceiling lights and task lighting for a balanced three‑point system. A lighting study shows that layered lighting reduces eye strain by 22 % compared to single‑source illumination.
Accent Placement
Use spotlights to highlight artwork, architectural features, or plants. Position the beam at a 30° angle for wall art to minimize glare while maximizing color saturation.
Smart Integration
Many Style Spotlights are compatible with Wi‑Fi dimmers. Integrate them into a smart home hub to schedule on/off cycles, adjust brightness, or change color temperature based on time of day. Users who programmed a 10‑minute dimming schedule reported a 15 % reduction in energy consumption.
Final Checklist
- All tools prepared and safety gear worn.
- Mounting location measured and marked accurately.
- Bracket securely fastened with correct torque.
- Wiring connections verified with tester.
- Bulb and diffuser installed, beam angled appropriately.
- Post‑installation test completed, no flicker or buzz.
- Restoration steps performed if needed, with finish matching original.
- Styling elements (color, placement, smart control) finalized.
By following this data‑driven, step‑by‑step approach, you’ll not only achieve a flawless installation but also extend the lifespan of your Style Spotlights and enhance the overall aesthetic of your space. Happy lighting!