Industrial home lighting blends the rugged aesthetics of factories with the comfort of residential spaces, creating a bold, functional, and stylish environment. By leveraging high‑efficiency fixtures, strategic placement, and data‑driven design decisions, you can transform any room into a modern, well‑lit haven. Below is a step‑by‑step guide that walks you through planning, selecting, installing, and maintaining industrial lighting in your home, complete with actionable tips to ensure lasting success.
1. Assess Your Lighting Needs with Data
Measure Room Dimensions and Light Levels
- Use a laser measure: Capture length, width, and ceiling height for each space.
- Calculate square footage: Multiply length by width (e.g., 12 ft × 15 ft = 180 sq ft).
- Determine required lumens: For industrial ambience, aim for 30–40 lumens per square foot. A 180 sq ft room needs roughly 5,400–7,200 lumens.
Analyze Natural Light
- Track sunlight exposure using a smartphone app (e.g., Sun Surveyor) for a week.
- Record peak daylight hours and adjust artificial lighting plans accordingly to avoid over‑illumination.
2. Choose the Right Fixtures
Prioritize Energy Efficiency
- Opt for LED fixtures with a CRI (Color Rendering Index) of 80+ for true color reproduction.
- Look for the ENERGY STAR label; LEDs consume 75% less energy than traditional incandescent bulbs.
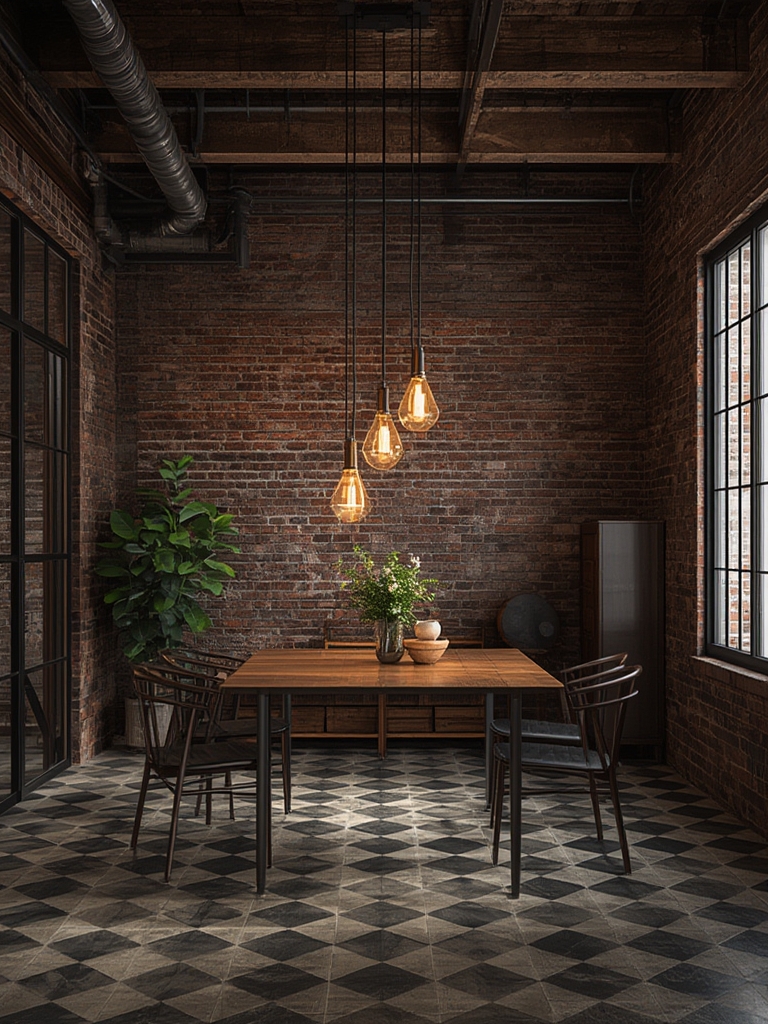
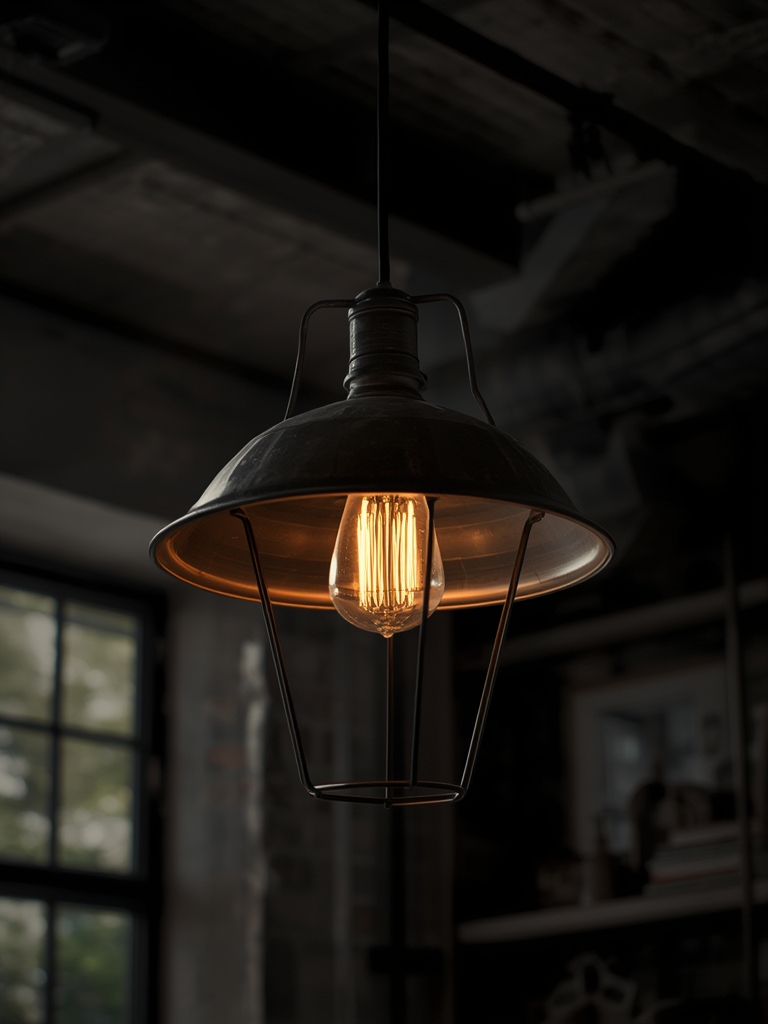
Select Industrial‑Style Designs
- Exposed bulb pendant lights – perfect for kitchens and dining areas.
- Metal cage fixtures – ideal for lofts and open‑plan living rooms.
- Track lighting systems – provide flexibility for adjustable spotlights in workspaces.
Match Fixture Output to Room Requirements
- Check the fixture’s lumen output on the packaging or manufacturer’s website.
- Use a simple formula: Total lumens needed ÷ lumens per fixture = number of fixtures. For a 180 sq ft room needing 6,000 lumens, a 1,200‑lumen pendant would require five fixtures.
3. Plan Fixture Placement for Optimal Coverage
Use the 30‑Degree Rule
- Position lights so the beam spreads at a 30° angle, minimizing shadows and glare.
- Measure the distance from the ceiling to the work surface; a 12‑inch clearance works well for most pendant lights.
Create a Lighting Layout Diagram
- Sketch a floor plan on graph paper or use a free online tool like RoomSketcher.
- Mark fixture locations, ensuring even spacing (generally 4–6 ft apart for track lighting).
Incorporate Layered Lighting
- Ambient: Overhead industrial fixtures for overall illumination.
- Task: Adjustable spotlights or under‑cabinet LEDs for work areas.
- Accent: Wall‑mounted sconces or LED strips to highlight architectural features.
4. Install Safely and Efficiently
Gather Essential Tools
- Voltage tester, wire strippers, screwdriver set, drill with appropriate bits, and a sturdy ladder.
- Use a non‑contact voltage detector to verify power is off before handling wires.
Follow Electrical Code Basics
- Turn off the circuit at the breaker panel.
- Connect wires using the color‑coded standard: black (hot), white (neutral), green or bare (ground).
- Secure connections with wire nuts and wrap with electrical tape for added safety.
Mount Fixtures Securely
- For heavy metal fixtures, locate ceiling joists using a stud finder and use toggle bolts or lag screws.
- Level each fixture with a bubble level to maintain the industrial aesthetic’s clean lines.
5. Optimize Performance with Smart Controls
Integrate Dimmers and Sensors
- Install LED-compatible dimmers to adjust brightness and extend bulb life.
- Use motion sensors in high‑traffic areas (e.g., hallways) to reduce energy waste.
Leverage Voice‑Activated Systems
- Connect fixtures to platforms like Amazon Alexa or Google Home for hands‑free control.
- Set schedules (e.g., dim lights at sunset) to create a consistent ambiance.
6. Maintain Your Industrial Lighting
Routine Cleaning
- Dust fixtures weekly with a microfiber cloth to prevent grime buildup that can dim light output.
- For metal cages, use a mild soap solution and a soft brush; rinse and dry thoroughly.
Monitor Performance Metrics
- Track energy consumption using a smart plug or an energy monitor; aim for a 10% reduction after the first month of optimization.
- Replace any flickering LEDs promptly, as they often indicate a failing driver.
Annual Inspection
- Check mounting hardware for loosening, especially in high‑vibration areas like kitchens.
- Inspect wiring for signs of wear or corrosion; replace if needed to maintain safety standards.
7. Boost SEO and Shareability of Your Post
Keyword Integration
- Primary keyword: industrial home lighting – include in the first 100 words, H2 headings, and image alt text.
- Secondary keywords: LED industrial fixtures, loft lighting ideas, energy‑efficient lighting – sprinkle naturally throughout the content.
Rich Media and Structured Data
- Insert high‑resolution images of each fixture type with descriptive
altattributes. - Use
schema.orgArticlemarkup to enhance search visibility.
Internal and External Links
- Link to related posts on DIY lighting projects and energy‑saving home upgrades for internal SEO juice.
- Reference reputable sources such as the U.S. Department of Energy for data on LED efficiency.
By following these data‑driven steps, you’ll not only achieve a striking industrial look but also create a functional, energy‑efficient lighting system that stands the test of time. Remember, the key to success lies in precise measurement, thoughtful fixture selection, proper installation, and ongoing maintenance. Happy lighting!