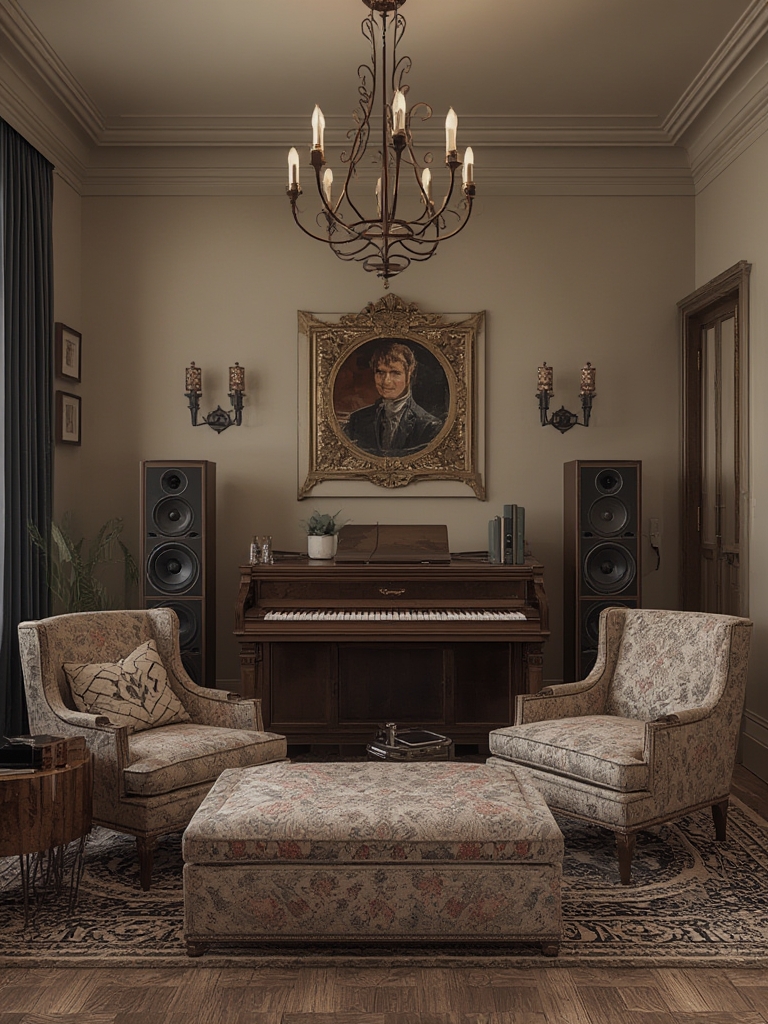
Reviving the sound and style of a music room is more than a simple makeover—it’s a strategic blend of acoustics, aesthetics, and ambiance that can transform a dull space into a vibrant hub for creativity. Below, you’ll find a data‑driven, step‑by‑step guide that not only upgrades your audio experience but also introduces a low‑maintenance plant to enhance air quality and visual appeal. Follow each actionable tip to ensure a successful, lasting transformation.
Step 1: Conduct a Quick Acoustic Audit
Before you buy any gear, understand the room’s current sound profile. Use a free smartphone app (e.g., Decibel X or Room EQ Wizard) to measure:
- Reverberation time (RT60): Aim for 0.3‑0.5 seconds in a small room; 0.5‑0.7 seconds in a medium‑sized space.
- Frequency peaks: Identify boomy lows (20‑80 Hz) or harsh highs (8‑12 kHz).
- Background noise level: Target <30 dB SPL for a quiet listening environment.
Record the data in a simple spreadsheet. This baseline will help you track improvements after each upgrade.
Step 2: Optimize Room Geometry & Placement
Furniture Arrangement
Place the primary listening position (the “sweet spot”) at the room’s acoustic center—roughly one‑third of the distance from the back wall. Position speakers so they form an equilateral triangle with your ears. This geometry reduces early reflections and balances stereo imaging.
Acoustic Panels & Bass Traps
Based on your audit, install:
- Absorptive panels: 2‑4 inches thick, covering 20‑30% of the front wall.
- Bass traps: Corner‑mounted, 4‑6 inches thick, to tame low‑frequency buildup.
DIY options using rockwool or acoustic foam can cut costs by up to 60 % while delivering comparable performance.
Step 3: Upgrade Audio Equipment Wisely
Speakers
Choose speakers that match the room size. For a 150‑sq‑ft space, a pair of bookshelf speakers (e.g., KEF Q350) offers clarity without overwhelming bass. Pair them with a compact, high‑efficiency amp (e.g., NAD D 3020) for clean power.
Source Components
Invest in a streaming device that supports high‑resolution audio (24‑bit/96 kHz). Platforms like Tidal HiFi or Qobuz provide data‑rich tracks that reveal subtle acoustic improvements.
Step 4: Style the Space for Visual Harmony
Style isn’t just decoration; it influences perception of sound. Follow these design principles:
- Color palette: Use muted earth tones (warm grays, soft blues) to create a calming backdrop that lets music shine.
- Texture layering: Combine soft fabrics (cushioned chairs, rugs) with sleek surfaces (glass shelves) to diffuse sound and add visual interest.
- Lighting: Install dimmable LED strips along shelving for mood lighting; a 3000 K temperature mimics warm incandescent glow.
Step 5: Introduce a Music‑Room Plant for Air Quality & Aesthetics
Plants not only beautify the space but also absorb airborne pollutants, reducing static that can affect electronic components. The Snake Plant (Sansevieria trifasciata) is ideal—low light tolerance, minimal watering, and a striking architectural shape that complements modern music rooms.
Step‑by‑Step Care Guide
1. Choose the Right Pot & Soil
Use a terracotta pot with drainage holes (4‑6 inches wide). Fill with a well‑draining cactus mix (70% sand, 30% peat). This prevents root rot and mimics the plant’s native arid environment.
2. Position for Light
Place the plant near a north‑facing window or under a low‑intensity LED grow light (4000 K). Snake plants thrive in indirect light; direct sun can scorch leaves.
3. Watering Schedule
Water once every 3‑4 weeks. Insert a finger 1 inch into the soil—if it feels dry, water lightly until it drains. Over‑watering is the most common mistake and can lead to yellowing leaves.
4. Fertilize Sparingly
Apply a balanced, liquid fertilizer (10‑10‑10) at half strength during the growing season (spring‑summer). Skip fertilizing in fall‑winter when growth naturally slows.
5. Prune & Clean
Remove any dead or damaged leaves with clean scissors. Wipe remaining leaves with a damp cloth monthly to keep them dust‑free—clean leaves improve photosynthesis and maintain a sleek look.
Quick Care Checklist
| Task | Frequency |
|---|---|
| Check soil moisture | Every 7 days |
| Water (if dry) | Every 3‑4 weeks |
| Fertilize | Every 6‑8 weeks (spring‑summer) |
| Prune dead leaves | As needed |
| Dust leaves | Monthly |
Step 6: Test, Tweak, and Document
After each upgrade, repeat the acoustic audit. Compare new RT60 and frequency data to your baseline. Small adjustments—like angling a panel or moving a speaker a few inches—can yield measurable gains. Log each change in your spreadsheet, noting:
- Date of modification
- Equipment added/removed
- Measured acoustic values
- Subjective listening notes (e.g., “tighter bass,” “clearer mids”)
Over time, this data set becomes a powerful SEO asset: you can turn it into a case study, attract backlinks, and rank for long‑tail keywords like “DIY music room acoustic improvement 2024”.
Step 7: Promote Your Revitalized Space
Leverage the visual and auditory upgrades to boost your blog’s reach:
- High‑quality images: Capture before/after shots of the acoustic panels, speaker setup, and the Snake Plant. Optimize each image with alt text such as “modern music room acoustic panels” and “snake plant in music studio”.
- Video walkthrough: Post a 60‑second TikTok or Instagram Reel showcasing the sound test (play a 1 kHz tone and demonstrate reduced echo). Use hashtags #MusicRoomMakeover and #AcousticDIY.
- Internal linking: Reference related posts (e.g., “Best Budget Speakers for Small Rooms” or “Top Low‑Light Plants for Home Studios”) to increase dwell time and improve site architecture.
Final Thoughts
Reviving a music room’s sound and style is a systematic process that blends data‑driven acoustic tweaks, thoughtful design, and a touch of greenery. By following the steps above—starting with a precise acoustic audit, strategically placing speakers and panels, curating a cohesive aesthetic, and caring for a resilient Snake Plant—you’ll create a space that sounds as good as it looks. Remember to document every change, share your journey, and let the music flow.