Keeping your pantry tidy isn’t just about aesthetics—it directly impacts food waste, meal planning efficiency, and even your grocery budget. A well‑organized pantry can cut down on time spent searching for ingredients, help you spot what you already have, and make it easier to follow a healthy eating plan. Below is a data‑driven, step‑by‑step guide to reviving your pantry storage, complete with actionable tips you can implement today.
Why Pantry Organization Matters (The Data)
Recent studies reveal the hidden costs of a chaotic pantry:
- Food waste: The National Kitchen & Bath Association reports that 40% of households discard food because they can’t see what’s inside.
- Time loss: A 2019 Harvard Business Review survey found the average family spends 15 minutes per day searching for pantry items, adding up to over 90 hours a year.
- Budget impact: The U.S. Department of Agriculture estimates that poor pantry management contributes to an average $1,200 extra grocery spend per household annually.
These numbers underscore the ROI of a systematic pantry overhaul.
Step 1: Empty and Inventory
What to Do
- Take every item out of the pantry and place it on a clean countertop or table.
- Group items by category (canned goods, grains, snacks, spices, etc.).
- Check expiration dates and discard anything past its prime.
Actionable Tips
- Use a timer: Set a 20‑minute alarm to keep the process focused and prevent fatigue.
- Digital inventory: Snap a quick photo of each category and upload it to a free note‑taking app (e.g., Google Keep). Tag items with expiration dates for easy reference.
- Quick discard rule: If a product is more than six months past its “best by” date, toss it. For non‑perishables, use the “two‑year rule” as a guideline.
Step 2: Categorize and Zone Your Space
What to Do
- Identify high‑frequency zones: Everyday Essentials (salt, oil, spices), Meal‑Prep Staples (pasta, rice, beans), and Occasional Items (holiday treats, specialty sauces).
- Assign each zone a specific shelf or section.
Actionable Tips
- Eye‑level placement: Store the items you use most often at eye level to reduce reach and improve visibility.
- Heavy‑bottom rule: Place heavier containers (large cans, bulk grains) on lower shelves to prevent accidents.
- Label zones: Use removable adhesive labels or a small chalkboard to mark each zone. This visual cue helps every household member maintain order.
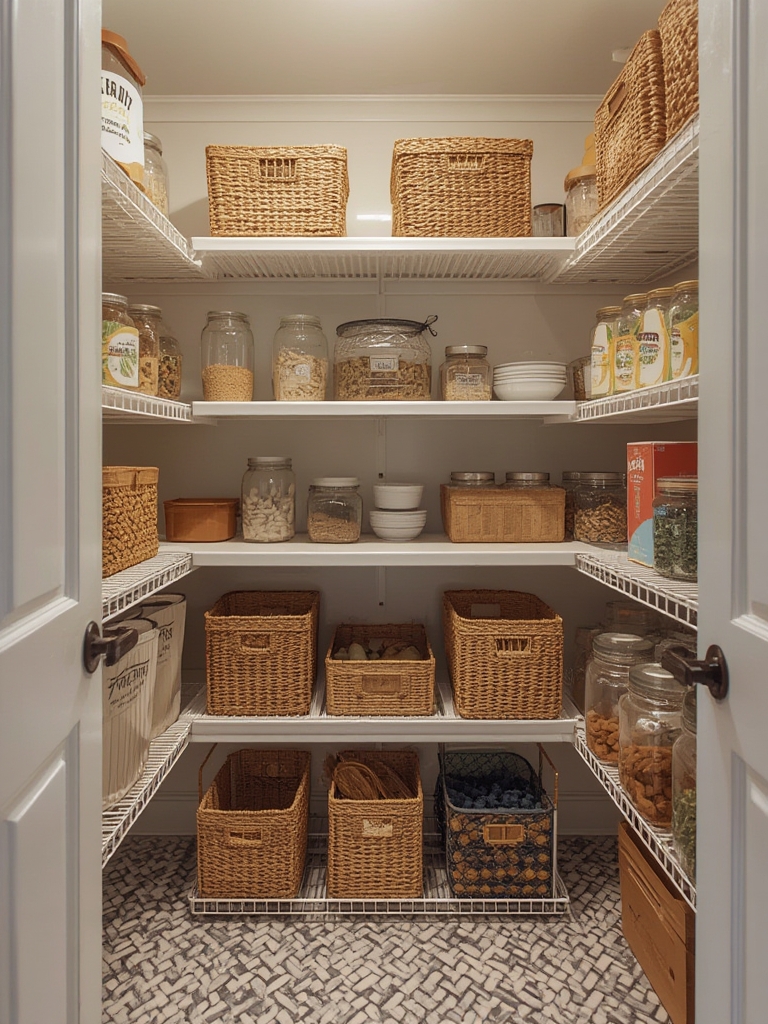
Step 3: Choose the Right Storage Solutions
Containers & Bins
Invest in clear, airtight containers for dry goods. According to a 2018 Consumer Reports study, households that switched to uniform containers reduced food waste by 23%.
- Clear jars: Ideal for pasta, rice, and cereals. The transparency lets you see quantity at a glance.
- Stackable bins: Perfect for snacks, baking supplies, and small packets.
- Adjustable shelf dividers: Use these to create custom-sized compartments for odd‑shaped items.
Labeling Systems
Consistent labeling eliminates guesswork:
- Label makers: Print legible, waterproof labels with the product name and “Best By” date.
- DIY chalkboard labels: Use a small piece of chalkboard paint on the lid for a reusable option.
- Color‑coded stickers: Assign colors to categories (e.g., green for grains, blue for canned goods) for quick visual sorting.
Step 4: Implement the “First‑In, First‑Out” (FIFO) Method
How It Works
FIFO ensures older items are used before newer ones, minimizing waste.
- When restocking, place new items behind older ones.
- Rotate the front of each shelf weekly to keep the oldest products within easy reach.
Actionable Tips
- Weekly check: Spend 5 minutes each Sunday scanning the front row of each zone for items nearing expiration.
- Use a “use‑me‑first” basket: Keep a small basket at the pantry entrance for items you plan to consume within the next week.
Step 5: Optimize Space with Vertical and Hidden Storage
Vertical Solutions
- Door-mounted racks: Install slim racks on the pantry door for spices, condiments, or small jars.
- Tiered shelves: Use tiered trays for canned goods to double the visible inventory without sacrificing accessibility.
Hidden Storage
Make use of often‑overlooked spots:
- Behind the pantry door: Attach a magnetic strip for metal tins and spice tins.
- Bottom drawer: Store bulk items like flour or sugar in airtight bins that slide out easily.
Step 6: Maintain the System
Daily Habits
- Return items to their designated zone immediately after use.
- Wipe down shelves with a damp cloth weekly to prevent crumbs and spills.
Monthly Review
- Perform a quick scan for expired or damaged items.
- Reassess zone placement—if a category has grown, consider expanding its space.
- Update labels if you’ve introduced new products.
Bonus: Smart Pantry Tech (Optional Upgrade)
If you’re tech‑savvy, consider integrating a few low‑cost gadgets to automate parts of the process:
- Bluetooth scales: Place a scale under a container; it syncs with a pantry app to track quantity.
- QR code labels: Scan with your phone to instantly see expiration dates and suggested recipes.
- Voice‑activated assistants: Ask Alexa or Google Home, “What’s the first item I need to use from the pantry?” for a quick FIFO reminder.
Conclusion: Turn Your Pantry into a Productivity Hub
By following these data‑backed steps—emptying, categorizing, selecting the right containers, applying FIFO, maximizing vertical space, and establishing maintenance habits—you’ll transform a chaotic pantry into a streamlined, waste‑reducing, and budget‑friendly hub. The initial effort pays off quickly: expect to see less food waste, faster meal prep, and clearer visibility of what you actually have. Start with a 30‑minute weekend session, and watch your pantry—and your kitchen routine—revive.