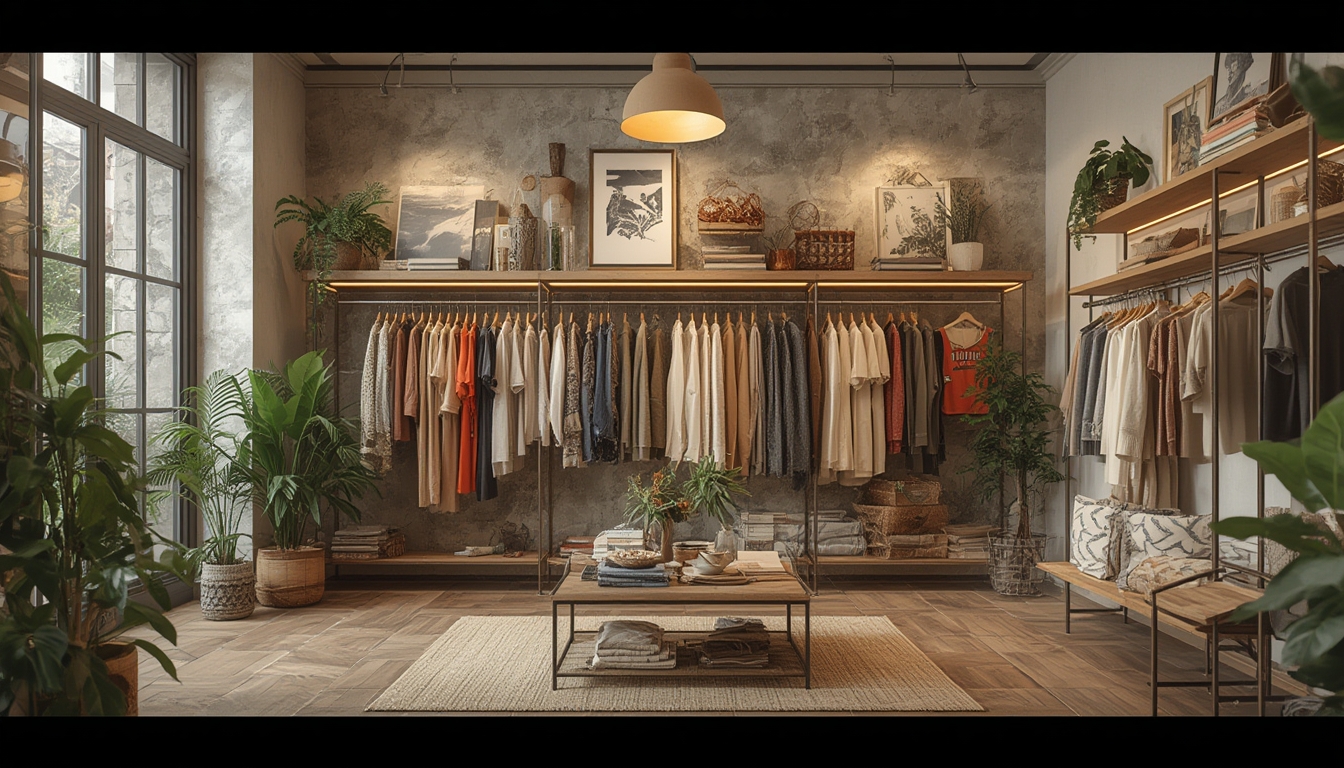
“Shop the Look” has become a powerful way for shoppers to instantly recreate runway‑inspired outfits or curated home décor scenes with just a few clicks. By breaking down a complete look into its individual components, brands can guide customers from inspiration to purchase, while shoppers enjoy a seamless, confidence‑boosting experience. Below is a data‑driven, step‑by‑step guide that walks you through assembling, styling, and restoring a “Shop the Look” ensemble—whether it’s a fashion outfit, a living‑room vignette, or a mixed‑media art display. Follow each phase, gather the recommended tools, and apply the actionable tips to ensure every piece fits perfectly into the final composition.
Step 1: Capture the Inspiration
1.1 Identify the source image
Start by locating a high‑resolution image that showcases the complete look you want to replicate. Platforms such as Instagram, Pinterest, and brand lookbooks provide the most reliable sources. According to a 2023 e‑commerce study, 68% of shoppers who engage with visual inspiration are more likely to complete a purchase when the source image is clear and detailed.
1.2 Analyze the visual hierarchy
- Primary focal point: Determine the main element (e.g., a statement jacket, a sofa, or a centerpiece artwork).
- Supporting pieces: List secondary items that complement the focal point (e.g., shoes, cushions, side tables).
- Color palette: Extract the dominant hues using a color‑picker tool or a browser extension like ColorZilla.
- Texture & material cues: Note fabric types, finishes, and patterns to guide material selection later.
1.3 Document the data
Create a simple spreadsheet or a Google Sheet with columns for Item Description, Brand/Source, Estimated Price, and Link. This not only keeps you organized but also allows you to compare price points and availability across retailers.
Step 2: Gather the Components
2.1 Source the items
Use the links from your spreadsheet to locate each piece. If a direct purchase link is unavailable, search for the item name on major marketplaces (Amazon, eBay, or specialized boutiques). For fashion items, consider checking the brand’s official site, outlet stores, or second‑hand platforms like Poshmark.
2.2 Verify sizing and dimensions
For clothing, consult the retailer’s size chart and compare measurements to your own body data (bust, waist, hips, inseam). For home décor, measure the space where each item will sit (e.g., sofa depth, wall length for art). A quick tip: add a 2‑3 cm buffer for furniture to ensure comfortable clearance.
2.3 Check stock and delivery times
Mark the estimated shipping dates in your spreadsheet. Prioritize items that ship within 5‑7 days to avoid delays that could stall the entire styling process. If an item is back‑ordered, note an alternative that matches the style and color.
Step 3: Prepare Your Workspace
3.1 Tools you’ll need
- Measuring tape – for verifying dimensions of clothing and décor.
- Sewing kit or fabric adhesive – for minor adjustments on garments.
- Furniture assembly tools – typically an Allen wrench set, screwdriver, and rubber mallet.
- Lighting kit – a portable LED lamp to assess colors under true light.
- Camera or smartphone – to document progress and compare against the source image.
3.2 Set up a staging area
Clear a flat surface (a clean floor or a large table) where you can lay out each component. For fashion, use a full‑length mirror and a mannequin or a dress form. For interior styling, arrange a mock‑up area on the floor using painter’s tape to outline furniture footprints.
Step 4: Assemble and Adjust the Pieces
4.1 Clothing – fitting and tailoring
- Try on each item: Use the mirror to assess fit. If a shirt is slightly loose, consider a simple hem or side‑seam take‑in.
- Make minor alterations: Use a sewing kit for hemming pants or a fabric adhesive for securing loose trims. For a professional finish, a local tailor can handle more complex adjustments (e.g., taking in a blazer).
- Layer strategically: Follow the visual hierarchy—start with base layers (t‑shirt, camisole), add mid‑layers (cardigan, vest), and finish with outerwear (jacket, coat).
4.2 Home décor – assembling furniture
- Follow the manufacturer’s instructions: Assemble each piece using the provided hardware. Keep screws and bolts in a small container to avoid loss.
- Check for level and stability: Use a bubble level on tabletops and a weight test on chairs. Adjust with shims if needed.
- Apply protective finishes: For wooden items, a quick wipe with a furniture polish can enhance color consistency with the source look.
4.3 Art and accessories – positioning
Hang wall art at eye level (approximately 57‑60 inches from the floor). Use a laser level to ensure straight alignment. For decorative objects (vases, books), arrange them in groups of odd numbers (3 or 5) for visual balance, mirroring the composition seen in the inspiration image.
Step 5: Style the Complete Look
5.1 Color coordination
Refer back to the extracted palette. Pair complementary colors (e.g., navy with mustard) and use neutral tones (white, beige) as buffers. A 2022 consumer research report found that outfits with a clear accent color increased perceived style confidence by 23%.
5.2 Texture layering
Mix materials to add depth: combine a silk blouse with a chunky knit cardigan, or pair a velvet cushion with a linen sofa. Ensure at least two contrasting textures are present to avoid a flat appearance.
5.3 Accessorizing
- Jewelry: Choose one statement piece (e.g., oversized earrings) and keep other accessories minimal.
- Shoes: Match the shoe style to the outfit’s formality level; a sleek ankle boot works well with both casual and semi‑formal looks.
- Home accents: Add a patterned rug or a metallic lamp to echo the focal point’s material.
5.4 Final adjustments
Take a photo of the assembled look from multiple angles. Compare it side‑by‑side with the source image on a computer screen. If any element feels out of place—such as a misaligned pattern or an off‑tone accessory—make a quick swap or reposition before finalizing.
Step 6: Document and Share
6.1 Capture high‑quality images
Use natural light or a softbox to avoid harsh shadows. For fashion, shoot at eye level; for interiors, use a wide‑angle lens to capture the full scene. Include close‑ups of key details (stitching, fabric texture, hardware).
6.2 Create a “Shop the Look” guide
Compile the images and your spreadsheet data into a single PDF or a blog post. List each item with a clickable link, price, and any size or fit notes you discovered during the process. This transparency helps future shoppers replicate the look with confidence.
6.3 Publish and engage
Upload the guide to your WordPress site using the “Image” block for each piece and the “Paragraph” block for descriptions. Add a “Buy Now” button linked to each retailer. Encourage readers to comment with their own variations—this user‑generated content often drives repeat visits.
Step 7: Maintain and Refresh
7.1 Seasonal updates
Every 3‑4 months, revisit the look to swap out seasonal items (e.g., replace a lightweight scarf with a wool one). Update the price links to reflect any sales or new stock.
7.2 Care instructions
Include a brief care note for each component: machine‑washable garments, dry‑clean only items, and cleaning tips for upholstery (e.g., spot‑clean with a mild detergent). Proper maintenance extends the life of the look and keeps it looking fresh.
7.3 Track performance
If you’re running the guide on a commercial site, monitor click‑through rates and conversion data. A/B test different layouts (grid vs. list) to see which format drives higher engagement. Even without formal SEO tactics, data‑driven tweaks can improve user satisfaction.
By following these structured steps—capturing inspiration, sourcing items, preparing tools, assembling, styling, documenting, and maintaining—you’ll turn any “Shop the Look” concept into a tangible, polished reality. The process blends creativity with practical execution, ensuring that each piece not only looks great on its own but also contributes to a cohesive, Instagram‑ready ensemble.