Creating a compelling real‑home tour is more than just pointing a camera at a living room. It’s a carefully orchestrated process that blends preparation, styling, and storytelling to give viewers an authentic, immersive experience. Below is a data‑driven, step‑by‑step guide that walks you through assembling, restoring, and styling a home tour from start to finish. Each section includes the essential tools, practical tips, and actionable advice to ensure a smooth, professional result.
1. Planning the Tour: Research and Layout
1.1 Define the Tour’s Purpose
Before you step foot inside the property, clarify the goal of the tour. Are you showcasing a historic renovation, a modern minimalist space, or a family‑friendly layout? Knowing the purpose helps you decide which rooms to highlight, the narrative flow, and the visual style.
- Tool: A simple spreadsheet (Google Sheets or Excel) to list rooms, key features, and shot types.
- Tip: Rank each room by visual impact (high, medium, low) based on past engagement data from similar tours.
1.2 Create a Floor‑Plan Blueprint
A clear floor‑plan acts as a roadmap for both the crew and the audience. Use a digital floor‑plan tool (e.g., SketchUp, Floorplanner) to map out the sequence of shots.
- Tool: SketchUp Free (online) for quick 2‑D/3‑D layouts.
- Actionable Advice: Mark “anchor points” where you’ll place the camera for 360° views; these become the focal moments of the tour.
1.3 Schedule and Permissions
Coordinate with homeowners, property managers, or real‑estate agents to secure a time slot that minimizes foot traffic and natural light fluctuations.
- Tool: Calendar app (Google Calendar) with reminders set 24 hours before the shoot.
- Tip: Verify that all necessary permissions (e.g., for drone shots) are documented and stored in a shared folder.
2. Preparing the Space: Restoration and Staging
2.1 Conduct a Quick Condition Audit
Walk through each room with a checklist to identify repairs, cleaning needs, and styling opportunities. Prioritize tasks that will have the biggest visual impact.
- Tool: Printable audit checklist (e.g., “Walls, Floors, Fixtures, Lighting”).
- Actionable Advice: Use a digital camera or smartphone to take “before” photos; these help you track progress and can be used for a before‑and‑after comparison in the final tour.
2.2 Basic Restoration Tasks
Address minor issues that can be fixed quickly without professional contractors:
- Wall Touch‑Ups: Fill nail holes, sand rough spots, and apply a fresh coat of neutral paint. Tip: Choose a matte finish to reduce glare on camera.
- Floor Refresh: Vacuum carpets thoroughly, mop hard floors with a pH‑balanced cleaner, and consider a light polish for hardwood.
- Fixture Polish: Clean light fixtures, door handles, and cabinet hardware with a microfiber cloth and mild soap solution.
- Tools Needed: Spackle, sandpaper (120‑grit), paint roller, microfiber cloths, gentle floor cleaner.
- Tip: Perform these tasks at least 24 hours before shooting to allow paint and cleaners to fully dry.
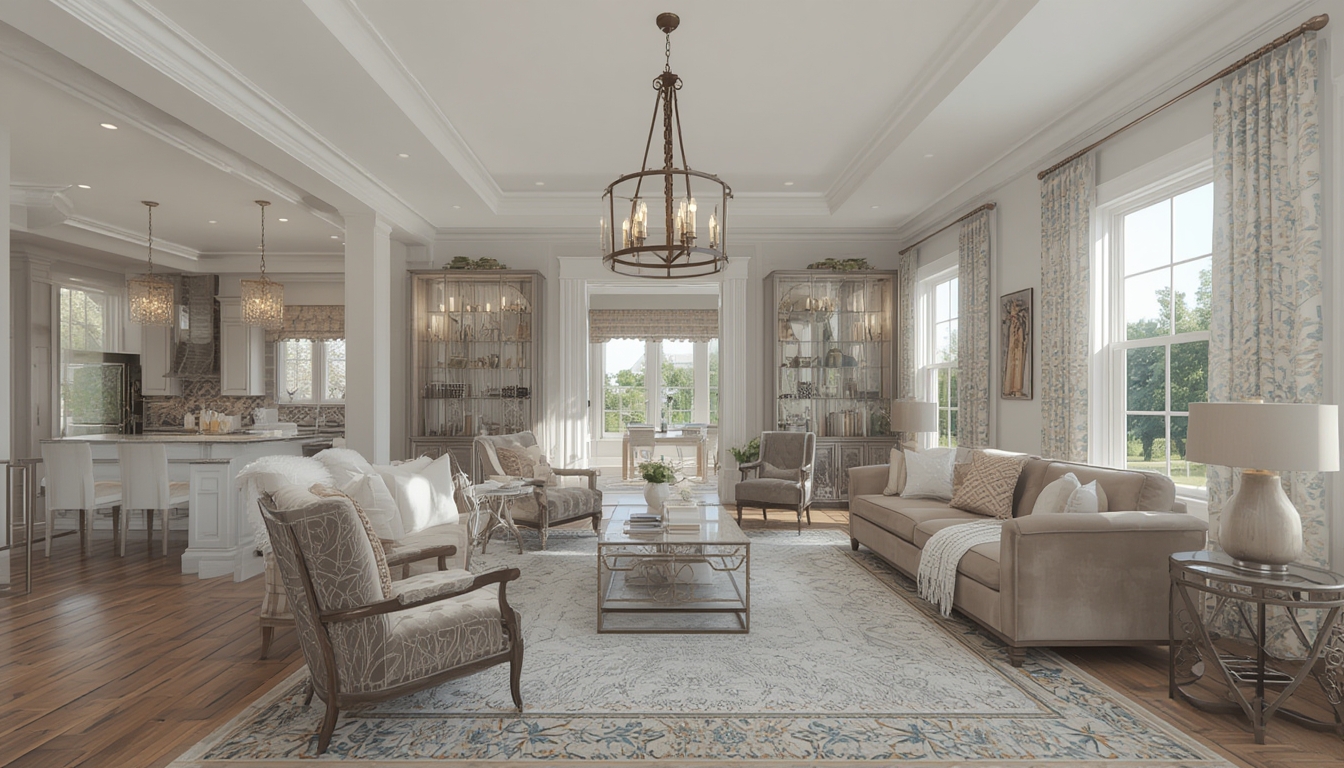
2.3 Staging Essentials
Staging transforms an empty or cluttered space into a lived‑in environment that resonates with viewers.
- Furniture Placement: Follow the “rule of thirds” – arrange key pieces off‑center to create visual interest.
- Layered Textiles: Add throw pillows, rugs, and blankets in complementary colors to add depth.
- Greenery: Place a few low‑maintenance plants (e.g., snake plant, pothos) to bring life and improve air quality.
Actionable Advice: Keep the total number of decorative items to a minimum (no more than 5‑7 per room) to avoid visual clutter and keep the focus on architectural features.
3. Assembling the Technical Setup
3.1 Camera and Lens Selection
For a high‑quality real‑home tour, a wide‑angle lens (16‑35 mm on full‑frame) captures spacious interiors without distortion.
- Recommended Gear: Sony A7 IV with 16‑35 mm f/2.8 G Master lens, or a Canon EOS R5 with the equivalent lens.
- Tip: Use a tripod with a fluid head for smooth panning shots.
3.2 Lighting Setup
Natural light is ideal, but supplemental lighting ensures consistency.
- Key Tools: Portable LED panels (e.g., Aputure Amaran), softboxes, and a light meter.
- Actionable Advice: Position LED panels at 45° angles to the subject to reduce harsh shadows; set color temperature to 5600 K to match daylight.
3.3 Audio Capture (Optional)
If you plan to add narration or ambient sound, a shotgun microphone or a lapel mic will capture clear audio.
- Tool: Rode VideoMic Pro + or a wireless lavalier system.
- Tip: Record a short test clip in each room to check for echo; add acoustic panels if needed.
4. Shooting the Tour: Step‑by‑Step Execution
4.1 Establish a Consistent Walkthrough Pace
Maintain a steady walking speed (approximately 1.2 m/s) to ensure smooth video playback. Use a gimbal or a stabilizer for handheld shots.
- Tool: DJI Ronin‑S gimbal for DSLR/mirrorless cameras.
- Actionable Advice: Practice the route twice without recording to gauge timing and identify any obstacles.
4.2 Capture Key Shots per Room
- Establishing Shot: Start at the doorway, slowly pan across the room to set context.
- Detail Shots: Focus on unique features (e.g., a custom fireplace, built‑in shelving). Use a slider for smooth horizontal movement.
- 360° View: If you have a 360‑camera (e.g., Insta360 One X2), mount it on a tripod and record a full rotation.
- Transition Shot: Walk through doorways with a slight tilt down to guide the viewer’s eye.
Tip: Keep the camera’s ISO as low as possible (ISO 100‑400) to minimize noise, adjusting aperture to f/4‑f/5.6 for adequate depth of field.
4.3 Managing Light Changes
When shooting across multiple rooms, lighting can shift dramatically. Use a handheld light meter to record exposure values (EV) for each space, then lock those settings on the camera.
- Actionable Advice: If daylight changes during the shoot, pause and re‑balance white balance using a gray card.
5. Post‑Production: Editing and Publishing
5.1 Organize Footage
Import all video files into a dedicated project folder. Rename clips using a consistent convention: RoomName_ShotType_SequenceNumber (e.g., LivingRoom_Establishing_01).
- Tool: Adobe Bridge or a simple script in Python for batch renaming.
- Tip: Create a “proxy” folder with lower‑resolution copies for faster editing.
5.2 Edit the Tour
Use a non‑linear editor (NLE) like Adobe Premiere Pro or DaVinci Resolve.
- Rough Cut: Place establishing shots in sequence, trimming each clip to 8‑12 seconds for a brisk pace.
- Transitions: Apply subtle cross‑dissolves (0.5 s) between rooms to maintain flow without distraction.
- Color Correction: Match white balance across clips using the “Color Match” feature; add a slight lift to shadows for a warm, inviting look.
- Audio Overlay: Insert background music (royalty‑free) at a low volume (‑20 dB) and add narrated pointers if desired.
Actionable Advice: Export a 1080p version for quick review before rendering the final 4K master.
5.3 Export Settings for WordPress
WordPress handles video via the native media library or an embedded player (e.g., YouTube, Vimeo). For optimal performance:
- Resolution: 1920 × 1080 px (1080p) for faster load times; keep a 4K version for premium viewers.
- Codec: H.264 (MP4) with a bitrate of 10‑12 Mbps.
- Thumbnail: Export a high‑contrast still from the establishing shot; set it as the featured image.
6. Final Checklist Before Publishing
6.1 Technical Review
- All video files uploaded correctly and playable on multiple devices.
- Captions or subtitles added for accessibility.
- Metadata (title, description, tags) filled in for each video file.
6.2 Visual Consistency
- Color grading uniform across all rooms.
- No abrupt jumps in exposure or focus.
- All branding elements (logo, color palette) placed consistently.
6.3 User Experience Test
- Navigate the tour on a desktop, tablet, and smartphone to ensure responsive playback.
- Check loading speed; aim for under 3 seconds for the first frame.
- Gather feedback from a small test audience (2‑3 people) and make final tweaks.
By following this structured, data‑driven approach, you’ll produce a real‑home tour that feels polished, authentic, and engaging. Each step—from pre‑planning to post‑production—has been broken down into actionable tasks, complete with the tools you need and practical tips to avoid common pitfalls. The result is a seamless walkthrough that showcases the property’s best features while delivering a professional viewing experience for your audience.